DIY Trick or Treat Halloween Pillow
This post and the photos within it may contain affiliate links. As an Amazon associate I earn from qualifying purchases. If you make a purchase through one or more of the links, I may receive a small commission at no extra cost to you.
A few weeks ago we shared a “Hello Fall” pillow we made using the Cricut Maker and Iron-On Vinyl. We couldn’t help but make a new pillow for Halloween–this time a DIY Trick or Treat pillow!

This DIY pillow requires the following supplies:
-an 18×18″ pillow cover (we purchased this Orange Pillow Cover from Amazon–SHOP HERE)
-Cricut Maker or other Cricut cutting machine (SHOP THE CRICUT MAKER HERE)
-Cricut White Iron-On Vinyl (SHOP CRICUT IRON ON VINYL HERE)
-18″ pillow insert
-Iron or Heat Press
Not required, but will make your life SO much easier:
-Cricut BrightPad (you can lay your cut image on the BrightPad, making weeding out the extra iron-on vinyl easier!) SHOP CRICUT BRIGHTPAD HERE.
-Cricut EasyPress (the new portable heat press from Cricut that will provide professional iron-on results!) SHOP CRICUT EASYPRESS HERE.
This pillow uses an SVG file that I already owned, as well as cutting images available in Cricut Design Space. The “Trick or Treat” font was purchased online (in one of those craft bundle deals) but there are other “Trick or Treat” images on Design Space that could be edited and used for this pillow. Here is a link to a search for “trick or treat” in Design Space (CLICK HERE.) And a lot of them are available with Cricut Access, which you can find out more about by clicking HERE.
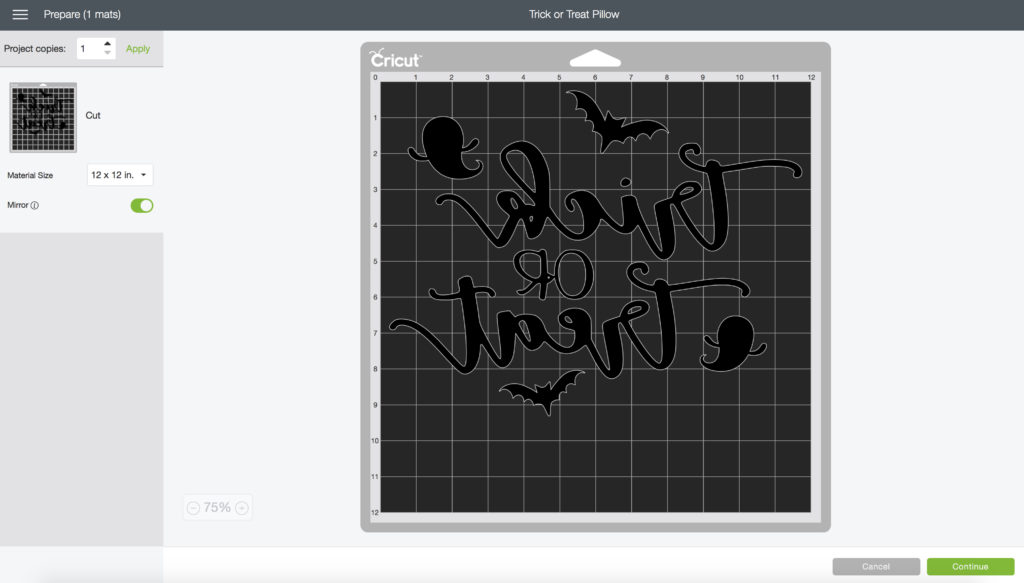
The ghost and bat images are available in Design Space. Be creative! You can use images you purchase to create a 12×12″ Trick or Treat pillow image (the widest you can cut) that perfectly fits your home and style! And using Design Space is easy–just make sure once you are ready to cut your image, you have it set to cut “mirror image” and the shiny side of the iron-on vinyl is placed down on the cutting mat. Your computer screen when ready to cut should look like this:
Once you have your image cut, weed out the extra vinyl and iron on to the center of the pillow cover according to the instructions of the heat source you are using. Insert the pillow, and you’re all done!
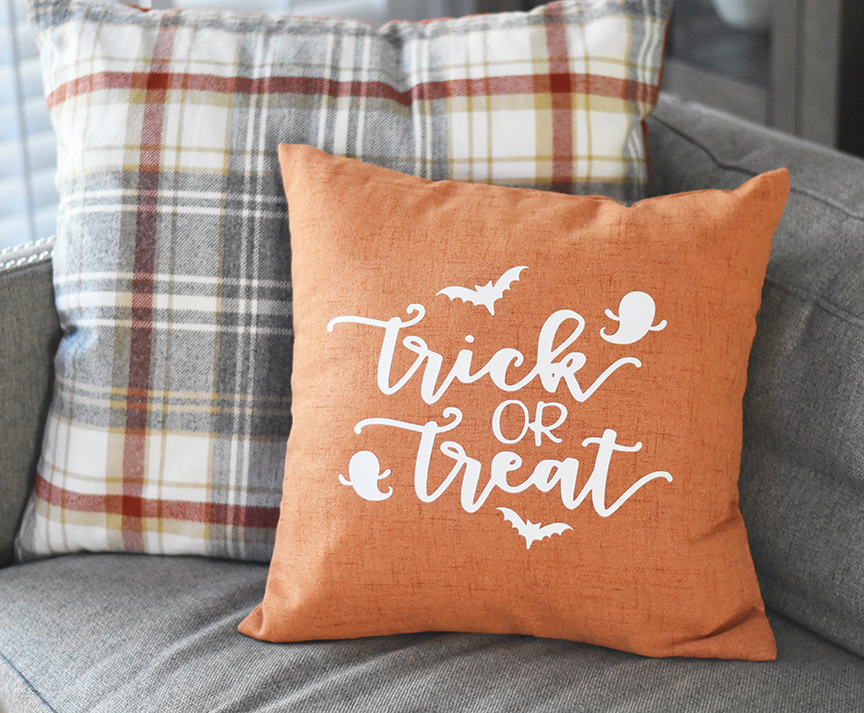
In just a short amount of time, you have a cute pillow to use for Halloween decor!
Looking for other DIY Halloween Projects from Pineapple Paper Co.? CLICK HERE to search our blog for more ideas!
This post contains affiliate links. If you decide to make a purchase through these links, I will receive a small commission, at no additional cost to you. These links help us to keep our blog content free, so thank you!


ABOUT CHARYNN
Hi, y’all! I’m Charynn, the owner and designer of Pineapple Paper Co. I’m a mom of four kids (two girls and two boys) living in Pittsburgh. I love hand lettering, anything southern, cocktails, and of course, pineapples! I am excited to share my SVG files, printables, and craft projects with you! The pineapple is a symbol of hospitality, and I welcome y’all to my little corner of the internet. Read more…
One Comment